Control the Sphero with the Leap Motion using Node.js

leap_sphero_node

A few months ago, I wrote a tutorial on how to control the Sphero with the Leap Motion using Cylon.js but I actually forgot to write one about using Node.js (which is what I started with).

If you’d like to go straight to the source code, you can find it on my github.

When I started working on this project, I used the Spheron module but I think something is not working with it anymore so I changed to the official sphero.js library.

If I start by explaining the setup of the app in Node.js, here is a snippet of my app.js file with comments to explain what everything does:

// require the relevant modules
var express = require('express'),
    path = require('path');

//create web server
var app = express();

//require the custom module
var test = require('./my_modules/sphero');
test();

// Everything in public will be accessible from '/'
app.use(express.static(path.join(__dirname, 'public')));
app.use(express.static(path.join(__dirname, 'views')));

app.all('*', function(req, res){
  res.sendfile('views/index.html');
});

app.listen(3001);
console.log("server running on port 3001");

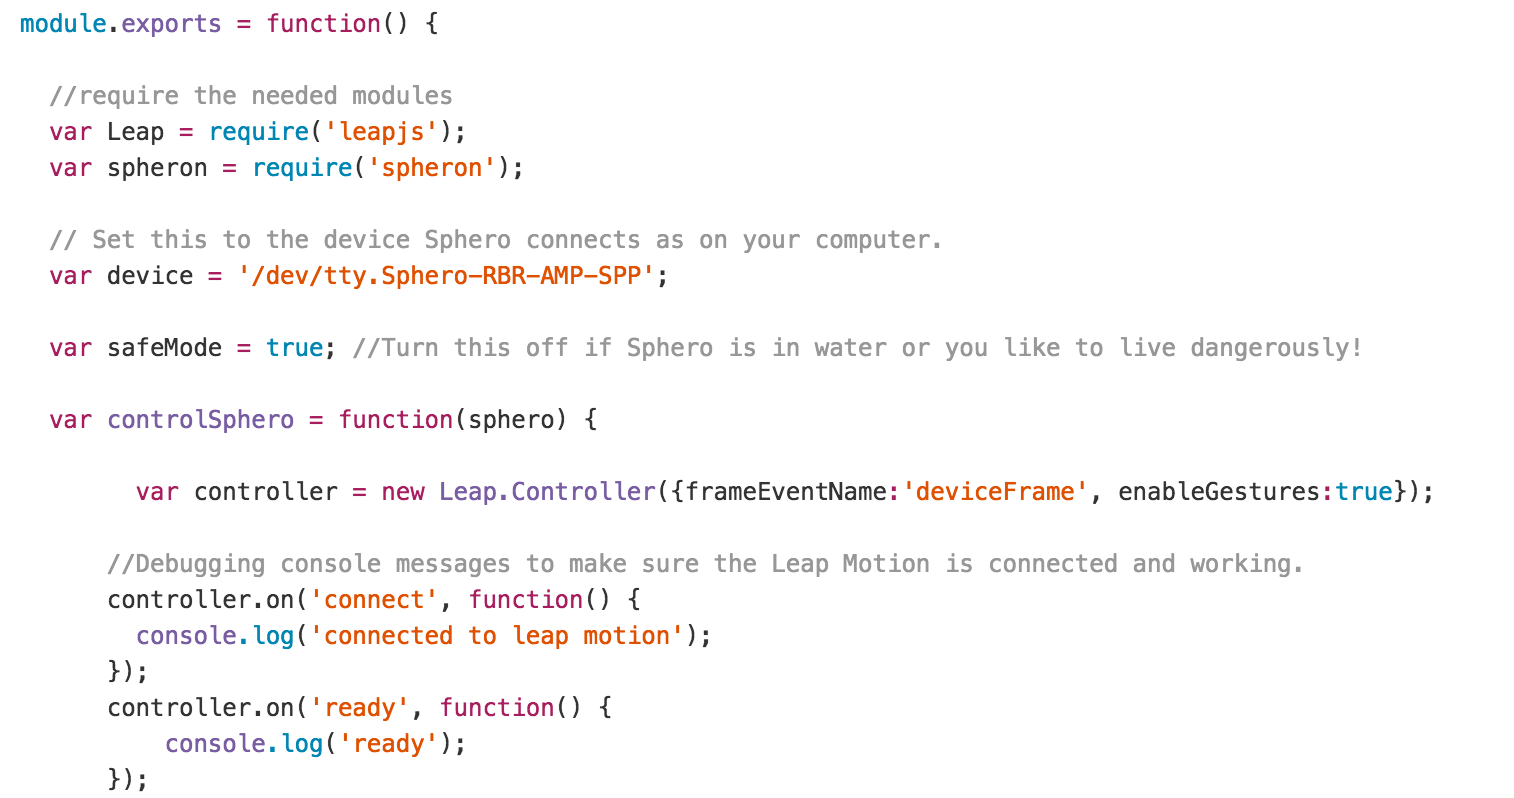
As you can see, this is pretty straight forward. The most interesting part of the code is inside my custom module (index.js file).

Snippet:

module.exports = function() {

  var Leap = require('leapjs');
  var sphero = require("sphero");

  // Set this to the device Sphero connects as on your computer.
  var device = sphero("/dev/tty.Sphero-RBR-AMP-SPP");

  var safeMode = true;

  var controlSphero = function(spheroBall) {

      var controller = Leap.loop({frameEventName:'deviceFrame',    enableGestures:true});

      controller.on('frame', function(frame) {
          if(frame.hands[0]){
            var g = frame.hands[0];
            handleSwipe(g);
          }
      });

      var handleSwipe = function(g) {
            var previousFrame = controller.frame(1);
            var movement = g.translation(previousFrame);
            var direction = '?';

            if(movement[0] > 4){
              direction = 'RIGHT'
            } else if(movement[0] < -4){  
              direction = 'LEFT'             
            }             

            if(movement[1] > 4){
              direction = 'UP'
            } else if(movement[1] < -4){               
              direction = 'DOWN'             
            }             

            if(movement[2] > 4){
              direction = 'REVERSE'
            } else if(movement[2] < -4){
              direction = 'FORWARD'
            }

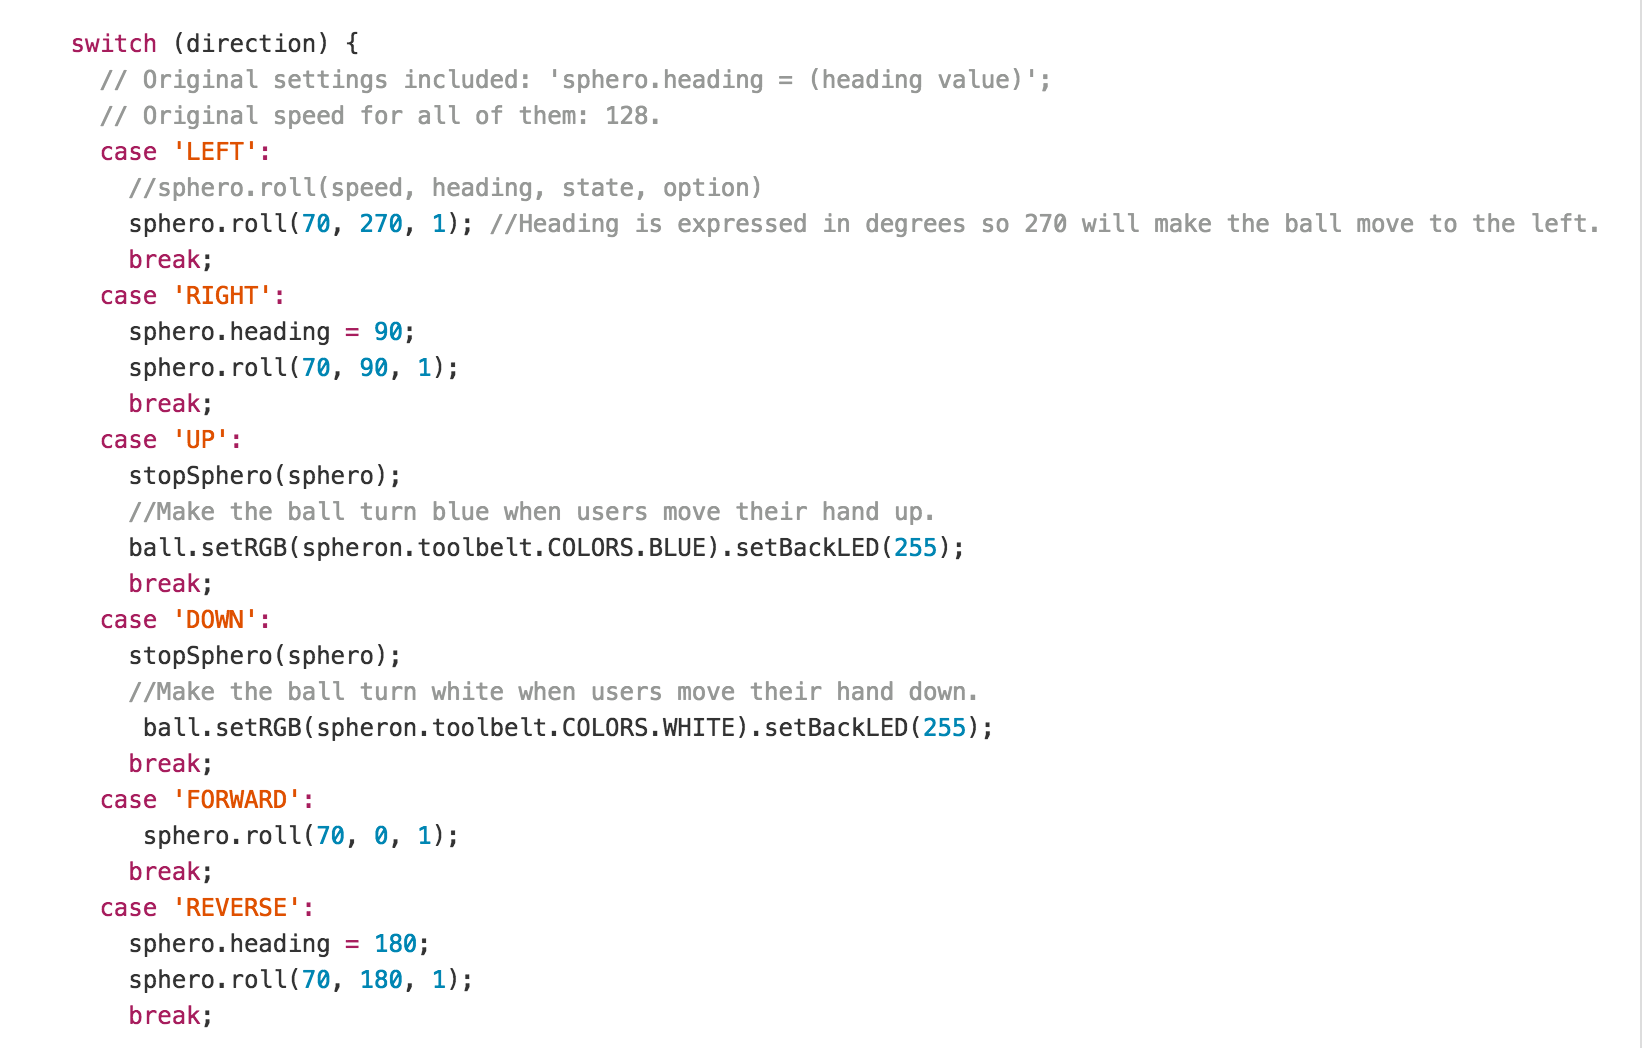
          switch (direction) {
            case 'LEFT':
              console.log('left')
              spheroBall.roll(70, 270, 1);
              break;
            case 'RIGHT':
              spheroBall.heading = 90;
              spheroBall.roll(70, 90, 1);
              break;
          }
      	console.log('Direction: %s', direction);
      }

        controller.connect();
      };

  // Stops the Sphero from rolling.
  var stopSphero = function(spheroBall) {
      spheroBall.roll(0,spheroBall.heading||0,0);
  };

  device.connect(function() {
      console.log('connected to Sphero');
      controlSphero(device);
  });

};

You start by requiring the modules you need, so here, ‘leapjs’ and ‘sphero’.

You then need to create an instance of the Sphero by using the reference of the ball on your computer.

To find that, turn your Sphero on as well as the bluetooth on your computer, connect to the Sphero, and once this is done, execute this command in your terminal: ‘ls /dev/tty.Sphero*’. The reference of the Sphero should appear and you just need to copy it in the code (it will probably be the same as mine).

Then, create an instance of the Leap Motion controller and start slowly by just tracking movement over it. Once you can track your hand, here is how you track the direction of your movement:

controller.frame(1);

tracks the first frame of your movement.

g.translation(previousFrame);

gets you the difference between your first frame and the current frame, so you can see which coordinate is the most impacted by your movement and therefore get the direction.

These coordinates are in the format “x,y,z” so horizontal axis, vertical axis and depth.

Once you got that working, it’s time to hook up the Sphero and the Leap Motion together.

To make the ball roll, you simply need to call “.roll()” on the sphero, like this:

spheroBall.roll(70, 270, 1);

The attributes passed in are the following:

sphero.roll(speed, heading, state, option)

To finish, all you need to do is call the “device.connect” function to connect with your Sphero.

And that’s it!

Once again, don’t hesitate to fork the repo if you’d like to play with it yourself and improve it 🙂

Also, feel free to let me know if any of this is not working!

Have fun!

Controlling the Parrot AR Drone with the Myo armband in Node.js

myo-drone-nodjs-tutorial

Following the last tutorial I wrote on how to control the Sphero with the Myo armband, here is another one on how to control the Parrot AR Drone with the Myo using Node.js.

If you want to follow along, you can find the repo on my github.

To begin with, we need to setup the server configuration. After requiring the necessary modules, here is what we need to write:

var env = process.env.NODE_ENV || 'development';
if('development' == env){
  app.set('port', process.env.PORT || 3000);
  app.use(express.static(__dirname + '/public'));
  app.use("/node_modules", express.static(path.join(__dirname, 'node_modules')))
}

server = require('http').createServer(app);

var bayeux = new faye.NodeAdapter({
    mount: '/faye',
    timeout: 50
  });

  bayeux.attach(server);

  client = new faye.Client("http://localhost:" + (app.get("port")) + "/faye", {});

  client.subscribe("/drone/move", function (d) {
    console.log(d);
    console.log("drone move?")
    return drone[d.action](d.speed);
  });

  client.subscribe("/drone/drone", function (d) {
    console.log(d);
    console.log("drone stuff")
      return drone[d.action]();
  });

  server.listen(app.get('port'), function () {
    console.log("Express server listening on port " + app.get("port"));
  })

We use express to set up the server and Faye & Bayeux for the communications between the Drone and your app.

We also use the module ‘dronestream’ to be able to stream video from the drone to the browser that is listening on port 3001.

The rest of the code deals with the commands sent from the Myo to the drone. First of all, we need to create an instance of the Myo and then define some commands.

myo = Myo.create();

myo.unlock();

myo.on('fingers_spread', function(){
    takeoff();
});

myo.on('wave_in', function(){
    goLeft();
})

var takeoff = function () {
    flying = true;
    return faye.publish("/drone/drone", {
      action: 'takeoff'
    });
};

var goLeft = function(){
    stopped = false;
    setTimeout(function (){
      return faye.publish("/drone/move", {
        action: 'left'
        // speed: adjustXspeed
      })
    }, timeout);
  };

Once the instance of the Myo is created, it can detect certain types of movements and run functions accordingly.

The ‘myo.unlock()’ command should allow the Myo to be unlocked while you use the app. However, I noticed I still needed to execute the unlock gesture ‘double tap’ between each command… Then the ‘faye.publish’ allows to send the commands and make the drone move. You can adjust the action and speed as you like.

This is just a snippet so once again, if you wanna have a look at the rest of the code or if you want to play around with it, everything is available on my Github 🙂

Hope it helps and enjoy!

Controlling the Sphero with the Myo armband in Node.js

myo-sphero-node

I received my Myo armband a few months ago and I have been working on a few projects to control my other devices with it. To start with, I thought I would explain how I managed to control the Sphero ball using the movements of my arms and Node.js.

To follow along, you can view all the code on my github repo.

The setup of the server side is pretty straight-forward, here’s what is in my app.js file:

var express = require('express'),
    path = require('path');

var app = express();

var lab = require('./my_modules/myo_sphero');
lab();

// app.use(express.static(path.join(__dirname, 'views')));

//.all('*', function(req, res){
// res.sendfile('views/index.html');
//});

app.listen(3001);
console.log("Server running on port 3001");

As you can see, you start by requiring ‘express’ and ‘path’ to be able to start your server and serve your different files.

You then require the module you created and you call it so it can be executed when you start your app.

The commented part of the code gives you the ability to serve something in your browser as well by calling the files in your ‘views’ folder but I am not using it at the moment as I just make the connection between the Myo and the Sphero without building anything in the front-end. The first part calls all the files in your folder whereas the second part allows you to serve a single file.

Finally, the app uses the port 3001 that you can check in your browser by visiting http://localhost:3001.

Then, you can write your commands in your module; here’s a snippet of my index.js:

module.exports = function() {

  var spheron = require('spheron');
  var myo = require('myo');

  myo = Myo.create();

  // Set this to the device Sphero connects as on your computer.
  var device = '/dev/tty.Sphero-RBR-AMP-SPP';

  var safeMode = true;

  var controlSphero = function(sphero) {
    myo.on('wave_out', function(){
      myo.setLockingPolicy();
      console.log('RIGHT');
      sphero.heading = 90;
      sphero.roll(70, 90, 1);
    })
  }
}

Wrap your code into a ‘module.exports’ function to access it from other files.

Then, require the modules you need, create an instance of the Myo and find the reference of the Sphero on your computer by entering ‘ls /dev/tty.Sphero*’ in your command line once your Sphero and your bluetooth connection are on.

The controlSphero function checks if you are doing the ‘wave out’ movement with the Myo and if so, makes the Sphero roll to the right.

The myo.setLockingPolicy() command stops your Myo from being locked after a few seconds so you can keep on making movements and tracking them.

Myo updated their firmware and API recently and introduced an automatic locking of the armband to avoid accidental tracking of gesture but for this app, we need it to be turned off. You can usually pass in the value ‘none’ or ‘standard’ but I made it default to none. If you want to change this, you can find the myo.js file inside the myo module and find the function ‘setLockingPolicy’. You can learn more about this command on the API reference.

With the update of the firmware, new gestures have been added such as ‘index to thumb’ or ‘click’ and the ‘thumb to pinky’ has been removed so there is a little bit more you can play with.

Once again, if you’re interested, you can find the full code on my github.

Let me know if you have any question 🙂 Good luck!

Control the Parrot ARDrone with the Leap Motion in Cylon.js

cylon-drone-leapmotion

Following my tutorial on controlling the Sphero using the Leap Motion, I thought I would keep on converting my Node.js projects to Cylon.js and work on controlling the Drone with the Leap Motion.

If you’ve had a look at my last tutorial, you probably noticed that using Cylon.js makes it really easy to program for hardware and connect multiple devices together.

Below is the usual setup of any Cylon project:


var Cylon = require('cylon');

Cylon.robot({
  connections:{
    leapmotion: {adaptor: 'leapmotion'},
    ardrone: {adaptor: 'ardrone', port: '192.168.1.1'}
  },

  devices: {
    leapmotion: {driver: 'leapmotion', connection: 'leapmotion'},
    drone: {driver: 'ardrone', connection: 'ardrone'}
  },
 

As you can see, you simply need to specify which devices you are using, the more interesting bit comes in the rest of the code…

work: function(my){
   my.leapmotion.on('hand', function(hand){
     my.drone.takeoff();
     after((5).seconds(), function(){
       my.drone.land();
     })
   })
 }
}).start();

This code only makes the Drone take off when the Leap Motion senses a hand over it and land after 5 seconds (just in case it decides to go crazy…).

Then, if you want to make it do more interesting things, you will have to play around with what the Leap Motion has to offer; different types of gestures, distance, hands, fingers, etc… The Drone actions themselves are pretty straightforward:

  • my.drone.up();
  • my.drone.down();
  • my.drone.forward();
  • my.drone.back();
  • my.drone.left();
  • my.drone.right();

You can also make the drone rotate clockwise or counterclockwise but what I found the most awesome thing is that the cylon-ardrone module makes the ‘flip’ movement really easy to execute. On a ‘keyTap’ for example, your drone could do a backflip!!

The code for that would look like this:

 work: function(my){
   my.leapmotion.on('gesture', function(gesture){
     if(gesture){
       my.drone.takeoff();
       if(gesture.type === 'keyTap'){
         my.drone.backFlip();
         after((6).seconds(), function(){
          my.drone.land();
         }
       }
     } else {
       my.drone.stop();
     };
   };
 }
}).start();

If you wanna see the difference with Node.js, you can find my original Github repo here, otherwise here is the repo with more commands!

If you have any question, don’t hesitate!

Controlling the Sphero using the Leap Motion in Cylon.js

cylonjs-sphero-leap-motion

In my personal time, I love to play around with hardware and robots.

I started in Node.js but recently I discovered Cylon.js and after a quick play around with it, I found it pretty awesome and decided to rewrite my projects using this framework.

As a starting point, I decided to rewrite the project to control the Sphero with the Leap Motion.

You can find the original repo here, but here are a few code snippets:

Screen Shot 2015-01-10 at 3.02.47 pm

Screen Shot 2015-01-10 at 3.04.09 pm

The way it works is pretty straight forward. The Sphero connects via bluetooth and the Leap Motion needs to be plugged in your computer. Once the Sphero is detected, the hand is tracked by the Leap Motion and the direction will be applied to the Sphero.

Feel free to have a better look at the code on Github.

Now, let’s move on to Cylon.js. The first thing I noticed about this framework is the short amount of code necessary to get to the same result. I managed to do pretty much the exact same thing in 68 lines of code!

I guess what makes it easier is that Cylon already has some modules you can install to program for certain devices, like the ones below:

cylon-devices

To start using Cylon, you need to require it and specify which devices you are working with.

```
var Cylon = require('cylon');

Cylon.robot({
  connections: {
    leapmotion: {adaptor: 'leapmotion'},
    sphero: {adaptor: 'sphero', port: '/dev/rfcomm0'}
  },

  devices: {
    leapmotion: {driver: 'leapmotion', connection: 'leapmotion'},
    sphero: {driver: 'sphero', connection: 'sphero'}
  },

  work: function(f){
  }
}).start();
 ``` 

At the moment, this code is not really doing anything but you can see how to specify which devices you are going to use.

You have to specify a port for the Sphero because it connects to your computer via Bluetooth. To find the port for your own Sphero, run ‘ls /dev/tty.Sphero*’ in your console and replace the port in this code with the result you get.

The rest of the code goes inside the ‘work’ function as below:

```
work: function(my){
  my.leapmotion.on('frame', function(frame){
   if(frame.valid && frame.gestures.length > 0{
     my.sphero.roll(70,0,1);
   }
  }
}

 ``` 

The code above makes the Sphero go forward if the Leap Motion detects any kind of gesture.

For the full code, have a look at my github repo.

I’ll probably write another tutorial soon once I have a chance to rewrite another project but in the meantime let me know if you have any question!